Creating a Project
Create a project to easily select imagery across a large area. There are two main ways to create
Do one of the following, depending on if you want to create
 Create a Project by Drawing an AOI
Zoom to level 9 or higher.
Select an option from the menu to define an area of interest (AOI).
More InformationDraw an AOI Select Draw a Polygon, Drag a Rectangle, or Draw a 12km x 12km AOI. In the viewport, use the cursor to draw an area of interest.
Draw a 12km x 12km AOI is available at zoom level 7 or higher.
- Enter Well-Known-Text Select Enter WKT. In the dialog that opens, paste your AOI in WKT format from a source application, then select Search.
Upload a Shapefile Select Upload Shapefile. In the dialog that opens, select the shapefile you want to upload, then select Upload.
When creating an AOI from a shapefile, the following restrictions apply:
- No self-intersecting polygons.
- Only individual polygons should be included in a shapefile.
- No shapes with fewer than four vertices (e.g., single points, lines, triangles), and not exceeding 1000 vertices.
- No projections other than EPSG:4326 ("WGS84") and UTM (for every zone).
- Must be a ZIP file.
- Use the Viewport as the AOI Select Use Map Viewport. The current viewport becomes your AOI.
The Draw Tools icon
 appears.
Select the Draw Tools icon
. From the menu, select Create a Project. The New Project Settings dialog opens.
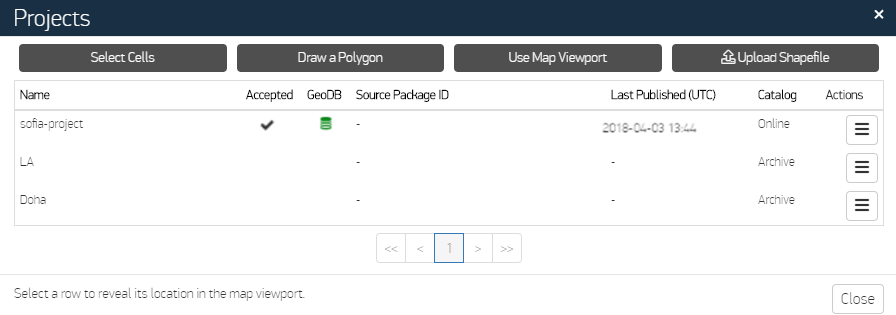
Create a Project in the Projects DialogOn the side panel, select the Projects icon
 . The Projects pane opens.
Select Manage Projects. The Projects dialog opens.

Projects Dialog
Depending on your account access, the Projects dialog includes or omits the Source Package ID.
Do one of the following:
Select Cells Select Select Cells. The Select Cells pane opens. Use the cursor to select individual cells for your AOI. Alternatively, select Drag to Select to draw a rectangle and select multiple cells. Select Save. (Available at zoom level 7 or higher.)
Draw a Polygon Select Draw a Polygon. In the viewport, use the cursor to draw an area of interest.
Use the Viewport as the AOI Select Use Map Viewport. The current viewport becomes your AOI.
Upload Shapefile Select Upload Shapefile. In the dialog that opens, select Upload a zipped shapefile to define the area of interest (AOI), then select the shapefile you want to upload. Select Upload.
Only project shapefiles that were previously exported are eligible for this option. Projects may have been exported from another account or on another network.
When creating a project by uploading a shapefile, the system returns a success message with a list of missing images, if any. Images might be missing when moving between networks where the content is not identical. Note that missing image strips are listed by legacy ID (catalog ID) while missing mosaic products are listed by Feature ID. If desired, select Upload to CSV to export the list of missing imagery.
For dynamic grid projects, the project AOI is not exported; at import, G-EGD creates an AOI from the bounding box that encloses the image extents.
The New Project Settings dialog opens.
In the New Project Settings dialog, in the Name field, give project a name.
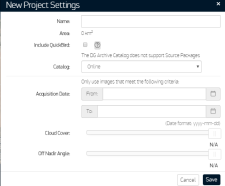
New Project Settings Dialog
(Optional) Select the Include QuickBird box and apply the date, cloud cover, and off nadir angle filters.
FGCM users may wish to exclude QuickBird (QB), which does not meet program accuracy requirements. The QB spacecraft is 60cm in resolution and 1:50,000 in scale.
From the Catalog drop-down, select the type of imagery you want to use to build the project. You can select Online or Archive imagery.
- (Optional) If you want specific imagery in your project, use the Acquisition Date, Cloud Cover, and Off Nadir Angle settings to filter the images that are returned based on those criteria.
Select Save.
The viewport zooms to your project and the Project Edit pane opens, listing all available images for the first cell, stacked with the most recent images that meet the filter criteria on top. Images that do not provide unique coverage are not selected.
Project areas are unlimited, but currently only 1000 images will be returned. This can result in unfulfilled areas in the project, although imagery is available on the platform. If your AOI is extremely large, consider creating two smaller projects.

What's Next?
- Edit the project. See Editing a Project.
If you have the large area download account configuration, export imagery as a mashup. See Creating Mashups from Project Imagery.
Mashups can only be created from Online projects. You cannot create a mashup from Archive projects.
- If you have the Source Packager or Source Packager QC account configuration, publish the project. See Publishing a Project for Use with ImageConnect in ArcMap.